

Metal clay and organic textures – they sound pretty far removed, don’t they? Here, we are going to discuss a method for including organic textures in a pendant. I used bronze, but silver would be quite effective.
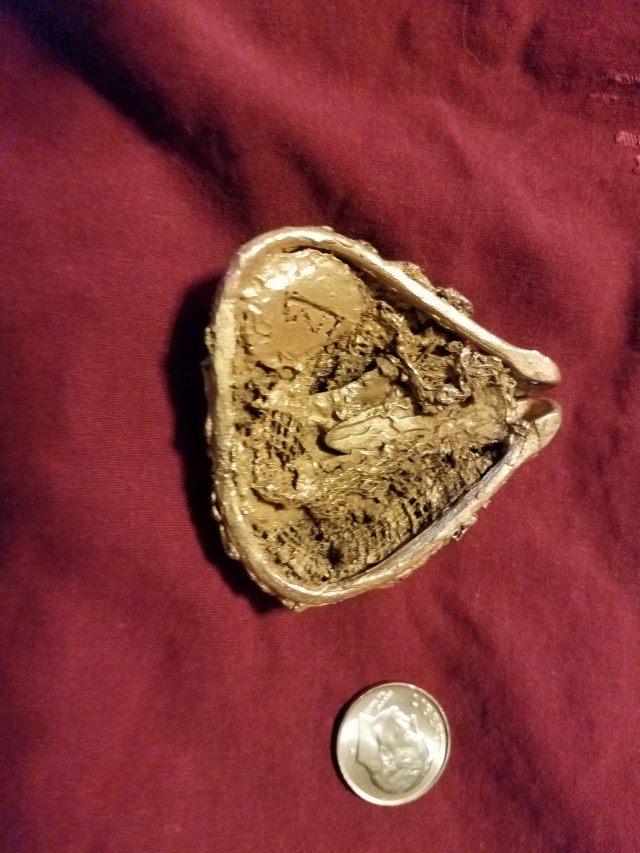
So we know where we are going, the finished piece appears below (with a coin for scale):

U have not yet decided what kind of chain it needs, but you don’t need to see the chain to get the idea.
I’m going to start with an apology. My camera malfunctioned, and I had not saved a backup copy of the pictures. Thus, I have no photos for the first steps in the process.
I started with wood clay (https://pmcconnection.com/metal-clay/wood-clay/wood-clay.html). To make a base for the work, I chose a ‘fat triangle’ template. I rolled the wood clay to a thickness of 3 mm. I then covered it with a smooth sheet of plastic wrap, put the template atop the plastic wrap, and pushed down with my thumbs around the edge of the template. This gives a natural, rounded shape without too much sanding. I let this dry, and then sanded off any imperfections – primarily ‘phlanges’ left around the edge (pressing with thumbs leaves a thin layer, but it still leaves some).
After this had dried, I used a syringe to extrude a long ‘snake’ of FastFire Bronz (https://pmcconnection.com/fastfire-bronzclay-100g.html). I wrapped the ‘snake’ tightly around the edges of wooden form, making a frame on which to attach metal clay. I chose to use the snake to make a bail for the pendant.
When this had dried, I used a mold to make a focal piece for the pendant (you will see it when I get to pictures). After that dried, I cut some long strips of cheesecloth. While silver dust will adhere to the cheesecloth, I had little success with bronze. Therefore, to get the clay onto the cheesecloth, I made a very watery paste of the clay, spread the cheesecloth out as widely as possible, and then painted it on. I let it dry and, where necessary, applied a second coat.
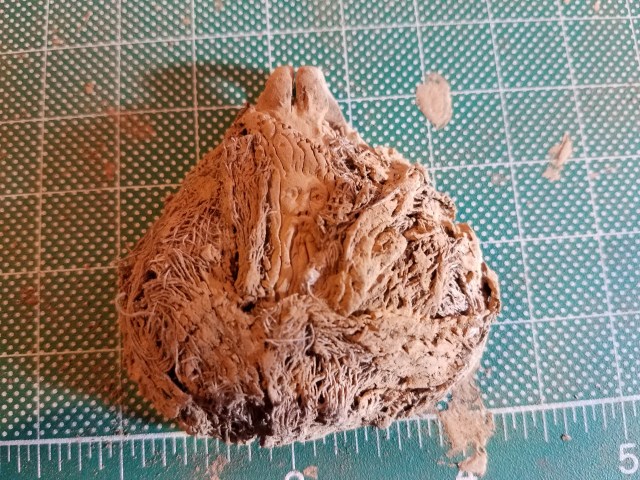
I then applied the bronze coated cheesecloth to the frame, making sure it did not cover the focal piece. I attached the cheesecloth to the frame with bronze clay paste, making sure it also adhered to the focal piece. This was an iterative process, applying more cheesecloth where I thought it necessary. The greenware, with the dried wood clay inside it, looked like this:
I fired it in coconut charcoal, with a ramp speed of 1000 degrees F, to a temperature of 1525 degrees F (caveat: your kiln might fire a bit hotter or colder than it says it does, so be sure to adjust accordingly). Silver clay, of course, does not require charcoal. With silver clay, the wood burns away, there is a great deal of smoke, and firing needs to be done in a well ventilated area. With the charcoal for the bronze clay, there was little (if any, I didn’t see any) smoke. Instead of the wood burning away, it charred into what amounts to a charcoal briquette. I was able to pry this out without too much difficulty after the piece had fired and cooled.
After the piece cooled, it felt strong. That is, I don’t think it needed reinforcement for purposes of holding together. However, I wanted to add some interest to the back, so I added more cheesecloth and fired again. The back before firing appears below. The odd marking on the bottom left is the maker’s mark for my jewelry studio.
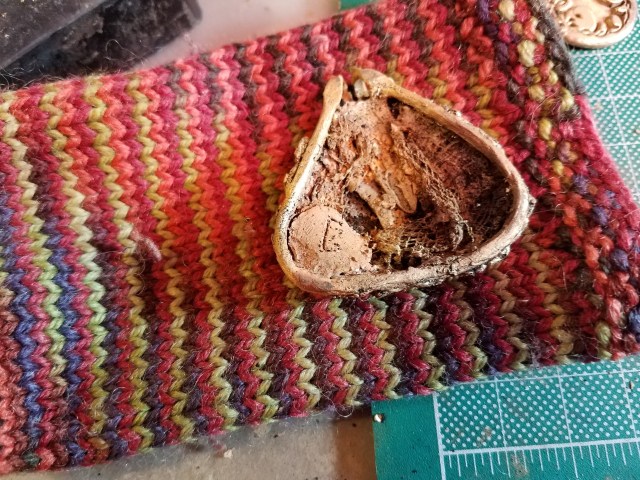

Even after firing, there were still some issues. For one thing, there were some sharp protrusions around the edges, places where I had not done a stellar job of joining the cheesecloth and frame evenly. These were surprisingly easy to remove by steadying the piece against a rubber block and filing away the undesired edges. The other problem was that the cheesecloth felt a bit ‘prickly’. I tumbled the piece for two hours. I noticed that the ‘prickles’ were much less prominent. I put the piece back in the tumbler and tumbled for another four hours. After that, the ‘prickles’ were gone, solving the problem.
After that, the piece was effectively finished. I made the choice to not patina it. Since it has the ‘organic’ look, I decided to let nature take its course and let the piece develop whatever patina it would.
You have already seen the finished front. The finished back appears below.
I hope you will try this technique. Just be sure to remember, if you use silver, to vent your kiln, open a window or door, and run a fan directed outward. While bronze produces little to no smoke, because of the charcoal, open shelf fired silver produces a great deal of smoke.
