

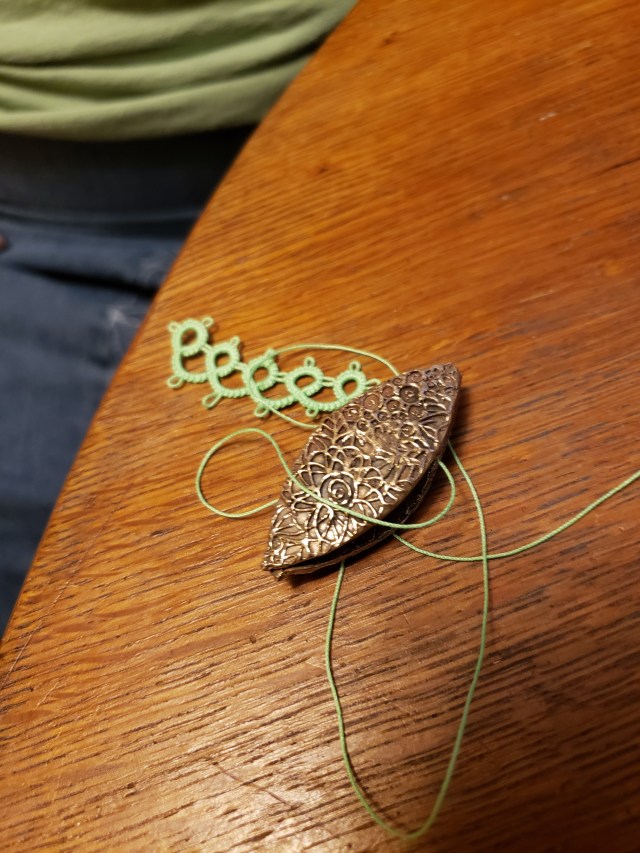
After much trial and error, I believe I have perfected making tatting shuttles with bronze clay. I am going to lay out for you what I have learned.
Start by making a template for cutting the shuttle leaves (the part you see in the photo above, plus the other one just like it on the other side) from stiff cardboard. You can trace an existing shuttle or you can draw your own. If you freehand, it doesn’t matter if you aren’t perfectly symmetric — you can fix that while finishing your greenware. Leaves can be 0.75-1.0 mm thick. It is best to use a texture, because a smooth metal shuttle is hard for the tatter to use.
Dry the cut out leaves on something curved. If you have a pre-existing plastic shuttle (or a metal one, that you can cover with plastic wrap), great. If not, you can use a dome light, which is what I did.
Instead of making a single central post, make two small central posts. Attach them with bronze slip, not quite touching, but close, symmetrically located about the center of one leaf. Make them a bit taller than you need (more about this in a moment). Use plenty of slip to make sure they hold. If necessary, sand to make the part of the leaf to which the posts attach smooth. Let this dry thoroughly.
To attach the other leaf, place the leaf (no slip yet) where it will go on the posts. Keep in mind that the tips of the shuttle need to touch. This will, almost certainly, not be the case. Start sanding the posts down. Sanding might not be symmetric — one post might need more than the other. After you have sanded a bit, replace the top leaf. Repeat this process until the tips of the leaves just touch, and the shuttle, looked at from the side, appears symmetric. Then attach the top leaf with slip. Use lots, because it is important that the leaf and posts fuse. Let this dry.
From the side, read into the greenware shuttle with a file. Remove any roughness left over from attaching the top leaf. Look at the greenware shuttle from above. Are there any assymetries (almost certainly, one leaf is a bit bigger than the other)? Sand the larger leaf down until it matches. Now turn the greenware shuttle over, and repeat the process. You might need to iterate, until you have achieved symmetry.
Now for the acid test. Place the greenware shuttle on its side. Let it rock back and forth. Then place it on its other side, and rock it in the same manner. If both rockings look the same, you are close enough to symmetry.
Now it is time to fire the piece. To keep the leaves from fusing where they touch, slip a small piece a paper between them. Since you will fire in activated charcoal, the paper will not burn. It might or might not char but, in either case, it is easily removed once it is fired. Fire the shuttle on its side. If you fire it with the leaves lying flat, charcoal might or might not surround the posts. Fire a bit longer than package directions say; since this is a tool, not jewelry, you want it to be tough.
Once firing is done, tumble and patina as you wish. Patina lightly, because the shuttle will be handled a lot, and you don’t want the patina to wear off. If you patina, be sure to apply a protective coating so the patina will not come off on the user’s hands. Also, be sure to apply the protective coating to the inside — you don’t want the bronze tarnishing and transferring color to the thread used in the tatting shuttle.
I have not yet tried silver. I believe it would work in a similar manner. I believe that sterling silver would be almost the same. I am not sure if fine silver is or is not hard enough to use. However, a small silver tatting shuttle made into a pendant would be a nice bit of jewelry for a tatter to wear.
