

Copper and bronze take patinas differently. That should be no surprise. However, you can exploit this to make some truly striking work. Here, I am going to tell you how to make a mixed metal earring and pendant set.
I used Art Clay Copper and Fast Fire Bronz. There are certainly other clays that you can use. However, these two shrink at about the same rate. If you use these, I can guarantee that you won’t have ugly gaps between your copper and bronze. If you use others, they might or might not work.
Your first step is to choose a texture that: (1) is quite deep (shallow textures don’t show) (2) doesn’t have fine lines (they tend to blur) and (3) is reasonably close to half recessed and half raised (lots of leeway here, just don’t choose something that is 90% one or the other). I selected a texture with flowers and vines. I made a pair of earrings and a pendant (some shape, but larger) our of copper clay. The greenware appears below. I used a pinch bail for the pendant, so only a hole in the top is needed until the final stage.)


The next step, after finishing and sanding, is to thin copper clay to the texture of Greek yogurt. Use distilled water. Tap water might or might not contain impurities that would interfere with sintering, and distilled water is cheap. Then, cover the copper with the bronze paste, making sure it fills the recessed areas. The earrings, at the step, looked like the following:
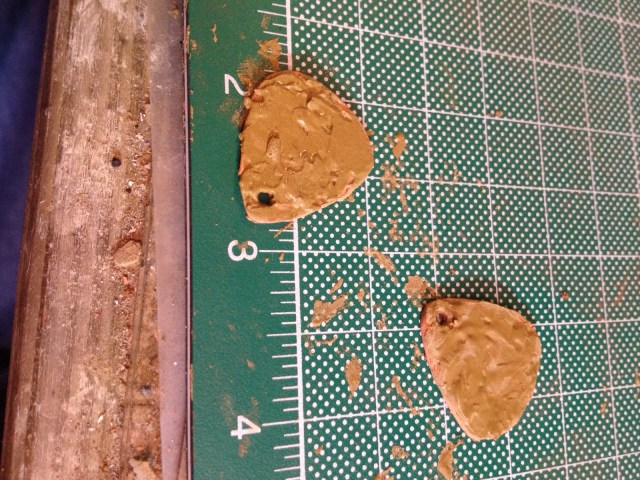
Yes, they are messy looking, but it doesn’t matter at this stage. Let the paste dry thoroughly. Then carefully sand the bronze past away. The result is that the bronze will stay in the recessed areas, but will be sanded away in the raised areas. After this stage, the pendant looked like:

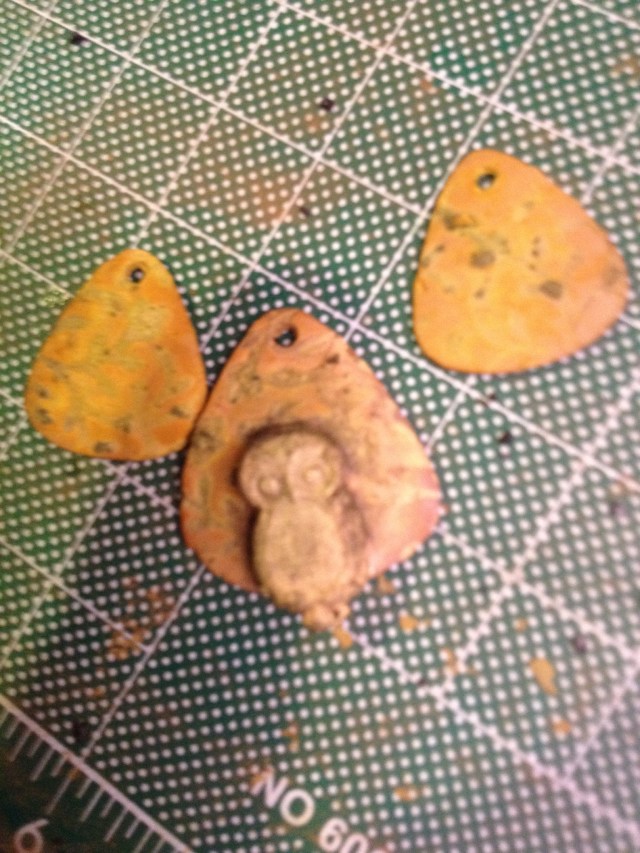
You can see the pattern in this piece because the bronze and copper clays are differently colored (and, yes, there is a divot on the side of the pendant, which I fixed after this photo with a sanding block). The earrings are done the same way.
OPTIONAL: I wanted to decorate the pendant with a figure. Using bronze clay, I made a small owl:

After the owl dried and I finished it, I attached it to the pendant with bronze paste.

Now fire the pieces. Yes, I know that bronze and copper fire at different temperatures. However, copper will fire at the right temperature for bronze if you give it enough time. Put the finished greenware in activated charcoal, with about 0.5 inches of charcoal below the pieces and about 0.5 inches above. Then, fire at whatever temperature you use for bronze (it varies among kilns) at full ramp for 3-3.5 hours. When your pieces come out of the kiln, they will appear somewhat disappointing — the bronze and copper’s colors will be so similar that it is difficult to see the pattern, and there might be some unattractive splotches on the work. Nothing to worry about…we’ll fix in the next step.
The next step is to polish the metal. While you can use a tumbler, you will get better results if you polish by hand (I don’t know why). To polish by hand, use multiple grades of sandpaper. Sand with the coarsest grade (lowest number) first. Then, sanding at a 90 degree angle to your original sanding, sand again with the next coarsest grade. (Polishing is grinding out the scratches from the previous sanding, which is why you change direction and use a finer grade of sandpaper). Continue using finer grades, shifting by 90 degrees each time, until you are happy with the shine you get (the deeper the shine, the better the piece will look when it is done).
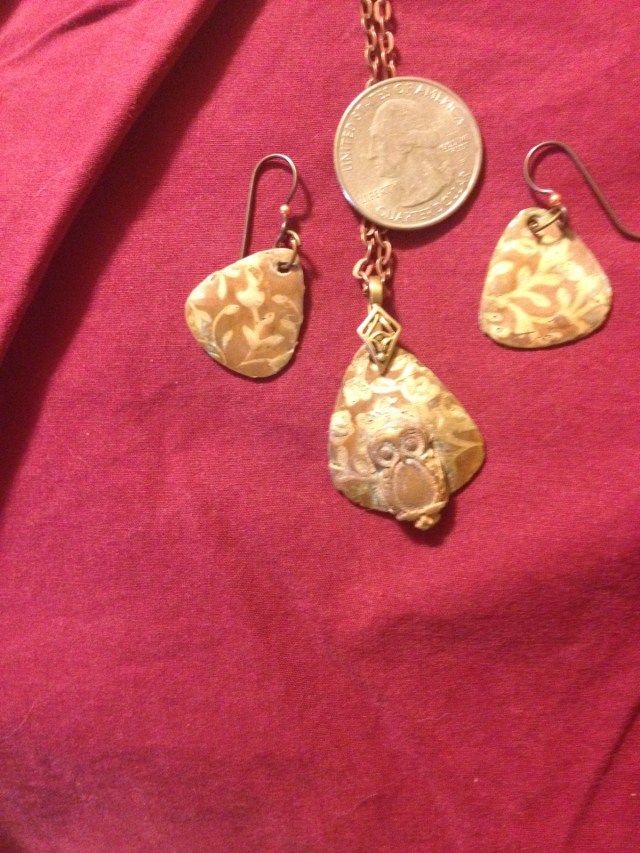
The final step is to patina. You can use liver of sulfur (just darkens), liver of sulfur plus salt and ammonia (darkens and adds a flash or red) or (my choice, and what I did here), Baldwin’s patina. Baldwin’s patina is not like liver of sulfur — you dab, not dip, and you don’t need to heat anything The more you dab, the more you darken the metal. The fun part about Baldwin’s patina: it reacts rapidly with the copper, turning it brown. However, it reacts very slowly with the bronze, leaving it shiny.
Here is the finished work, with findings added and a coin for scale:
Both the sanding away of the bronze paste and the hand finishing take time. However, if you are willing to invest the time, you get a unique and striking look!
